
Well, the sewing of the throw pillows for our bedroom makeover is underway! I started with this lovely pile of fabrics that you see above. Using the floral fabric, I covered a round pillow to make this adorable little accent pillow.
Are you ready for some cuteness? =)

Thankfully, my hubby doesn't even care that this looks like something that belongs in a little girl's room. I just HAD to have some pink in there somehow.
So, I also took step-by-step pictures to show you exactly how to create a cute pillow for yourself! It's a very picture-heavy post, but hopefully it will be helpful to someone who maybe wants to try sewing for the first time!
I started out by purchasing a pillow form from JoAnne's. You can make a pillow cover and just stuff it with batting, but pillow forms really help them keep their shape. Plus, if you're like me and enjoy changing things up all the time, they are easy to re-cover with new fabric!

Next, I laid the pillow form out on the fabric and traced a line around it for the pattern. I've done this 2 ways- by measuring and cutting an exact pattern and by tracing, and I've found that just tracing it out works just as well. And saves tons of time. No brainer!
Just leave about 1/2 inch of space. You want the pillow form to fit inside snugly, but not too tight!

After cutting out your pattern, you will end up with 2 identical circles of fabric.

Next comes the trim!

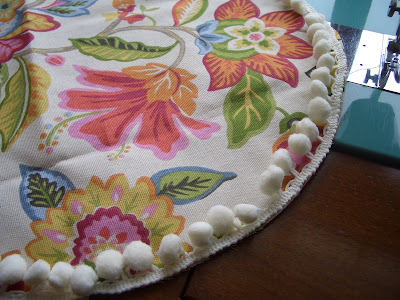
Leaving the trim on the spool, attach it with pins to ONE of the pieces of fabric, like so:

Here's a close up:

You will want to slightly overlap the trim before you make the final cut. Then comes the fun part! Start sewing! Keep your sewing line close to the edge of the fabric and trim, pulling out the pins as you go. One pin can break the needle on your sewing machine if it hits it at the wrong angle, so that's why you don't want to leave them in.

When you're done, you will have one circle with the trim attached.
Next, lay the other circle of fabric over the one you just sewed. The "bad" side should be facing out. Carefully pin the fabric pieces together, making sure to keep the outer edges together as much as possible.

That part's a little tricky. Be careful to not poke yourself with those pins! =)
Next, sew these two pieces of fabric together. As you are sewing, feel through the fabric to make sure you are sewing as close to the edge of the trim as possible. It's hard to explain, but basically you want the pom-poms to show through, and not the binding of the trim! It should look like individual pom-poms attached to the edge of the pillow when you are done.

As you are sewing, leave a space open that's about 4-5 inches wide. This will be used to stuff in the pillow form. On both sides of the gap, you will want to go forward and back up the thread a few times to make sure it is really stable!
When you turn the pillow cover right-side out, it should look like this:

Then, grab your pillow form and stuff, stuff, stuff until it's all inside!

You will end up with a little hole on one side, like this:

So you need to grab a hand-sewing needle and make some little stitches to bring it all together:

And voila! You have a decorative pillow!

I decided to add some covered buttons to mine to make it a little more polished. These can be found in any craft/sewing store in the "notions" section. They are super easy to make, and a little more challenging to attach. I haven't figured out the best way to attach them yet so you are on your own for that!


This project takes about an hour to complete! Not bad for a fun accessory!
Linking up to some fabulous parties here:


