Pages

Monday, February 28, 2011

Some New Goings-On


Well, we all know this blog is geared more towards decorating/remodeling/housewifing, but I just have to take a moment and share some exciting news with you guys!

I've been writing music for a long time, practically my whole life, but lately I've finally started working on actually recording some stuff.

So, I pulled together a band and we are heading to a recording studio this month to record some demo songs! I can't wait. I'm really not sure where this is headed, but I do know that it's a dream I've had forever. Plus, my sisters and some really good friends are joining in on this project so it's sure to be lots of fun as well!

I will let you know once things are on a roll (hello, Myspace musician page! Haha), but I just had to share my good news with you all!

Apparently, this quitting my day job thing has been helping in so many ways. I really feel like my creativity has spiked and I feel free to write, sing, create, and be who I am again. Has that ever happened for you? Have you "rediscovered" a dream lately? I would really love to hear all about it!

Final Photos and Review

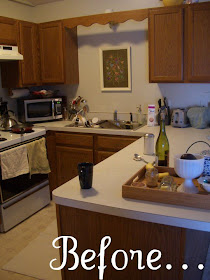
I sure love a good Before and After, don't you? Be it Trading Spaces, Extreme Home Makeover, What Not to Wear, pretty much any Before and After is enough to make my day.

But I have to say, this is one of my favorites EVER. Perhaps because it's my very own home?

So without further ado, I give you:

AND....


The kitchen is finally done! Well, the cabinets are at least. =) We also removed that ugly, scalloped wooden bracket that went between the top of those two cupboards. It really opened up the kitchen when we did that!


As you can see in the photo above, something has to happen with that light fixture soon too. The garish metal stands out even more against the nice, crisp cabinets!


I love the new hardware we found at Home Depot. It was a relatively inexpensive way to really update the kitchen.


Next on the list of things to replace are the countertop and the flooring. Woohoo!


Here's one final view of the lower cabinets too, because they were feeling so left out.


We used Rustoleum's "Cabinet Transformations" kit to create this new look for our kitchen. Since this product is still new, I figured it might be helpful if I gave an overview of the process and how it went for us!

First off, here is the process:

After giving your cabinets a thorough wash, you start off by scrubbing the cabinets (drawers, doors, and frames) down with green brillo-type pads and a "De-glosser" that is included in the kit. This removes any leftover grease and grime and also removes almost completely the layer of gloss protectant on the cabinets.

Then, after the cabinets are dry you apply 2 coats of the bond/colored paint. The color we chose is called "Linen." It's a slightly off-white color, but still very bright and crisp.

We ended up doing 3 coats of the bond paint, we just weren't happy with how much the wood grain showed through with only 2 coats.

The final step in the process is applying the protectant. This is a little runnier than the paint, and goes on clear, but provides the long-lasting protection for the cabinets. It takes a full 7 days to cure completely, but dries quickly enough for minor use.

So here's my thoughts, in a Pro/Con format.

Pro:
1. The process is quick. Much more time-friendly than the original sand/scrub/paint 7 layers/etc. process. If we had had enough space for all the cabinet doors, we probably could have finished in 1 day.

2. The De-Glosser does a really good job of removing all the traces of finish on the cabinets. Yay!

3. The bond paint is easy to apply, and goes on quickly and smoothly. We did end up doing 3 layers, but I think if you lay the 1st layer on thicker you might only need 2. We were a little stingy with the first coat of paint.

4. The color choices are great. We chose "Linen" and I'm really happy with the result. There are lots of other great colors to choose from as well!

5. There is a good amount of the product. We only used about 3/4 of the de-glosser, and we were pretty liberal with it! Also, we were able to apply 3 coats of paint to each surface. We used every last drop of the paint, but it was the smaller-sized kit and we did 1 extra coat than recommended. Not too bad!

5. Price-wise, I think it's a great deal! For $79 we got the whole kit, which includes the instruction brochure and a DVD, 2 cans of bond paint (which are taken out and tinted at the paint counter), 1 large bottle of De-Glosser, 1 can of Protectant Finish, scrub pads, Decorative Glaze (we didn't use this option), and even applicators for the Decorative Glaze. I didn't really price it out individually, but from what I can tell we got a great deal and the convenience of it is definitely worth it!

Cons:

1. It's still a LOT of work. This isn't an issue I have with the product itself, but I just have to give you this warning! We spent 13 hours slaving away last Sunday, and then probably another 5 hours throughout the rest of the week . It's a huge undertaking, but completely worth it in my opinion! I have never refinished cabinets the "old-fashioned" way, but from what I hear it takes MUCH longer.

2. The paint/bond coat is a little hard to work with. It dries quickly, so you have to be careful when applying it. Plus, they recommend you use a brush to apply versus a roller (to mimic the wood grains for the Decorative Glaze), which makes it somewhat challenging to get an even result.

3. The brochure says you only need 2 coats of the paint, but we weren't happy with how that looked. I wish there had been a leeeetle bit more paint to help us finish up the job (instead of having to purchase a larger sized kit, which is way more expensive at $150).

4. The final glaze is a lot runnier than the paint, and VERY drippy. Plus, when it drips and then dries, it adheres to the paint coat so if you try to remove the drip it pulls off all the paint too! I think this can definitely be avoided easily, you just have to be careful (especially with the doors, since you don't know if there are drips until you turn them over). It's just something to be aware of!

5. Depending on the humidity, it can take a LONG time for the paint to dry. This, again, is not really an issue with the product, but with the space we had to work with. We have a small townhome, so the only place we could put the cabinet doors while we worked on them was the garage. It ended up taking about 3 times as long for the cabinet doors to dry because of the moisture in the garage. Inside, the frames of the cabinet took about 45 minutes to dry enough to move on to the next step. If I were to do this project again, I would definitely have a nice, dry, bright space set aside to work on the cabinet doors. It would have save a lot of misery!


All in all, I think this is a great product. They are not paying me to say this (although you can definitely send a check my way, Rustoleum, if you want to! Hehe.), but I was very happy with the product. The benefits greatly outweigh the cons, and so far it seems like the finish is holding up really well to the minor wear it has seen since we completed the project!

Please feel free to ask away in the comments if you have more questions that I haven't answered, I am more than happy to help out! Remember to subscribe by email or check back if you ask a specific question.


Making

Friday, February 25, 2011

The Cabinets- A Sneak Peek!


Well, I am just now putting the finishing touches on our cabinets. Just barely in time, since we have guests coming over for dinner tonight!

I really didn't think this project would last all week, but I guess I should have known it would be longer than expected! So, even though I don't have the full "Before and After" to share, here's a couple of peeks at what we've done so far.


We used Rustoleum's "Cabinet Transformations" kit to refinish the cabinets. I will be writing a review of that soon because i know it's a new product, and I think you guys will be interested to hear about the process!

The doors and drawers all got new hardware too, I can't believe what a huge difference new hardware makes!


So there you have it. Now, I have to go put a final coat of paint on the last door before I start cooking up a storm! Hope you all have a FABULOUS weekend. I will be back on Monday with the whole Before/After.

XOXO,

Mikalah

Thursday, February 24, 2011

A Blank Page


I'm happy to say that, despite my Decorating ADD, the bedroom re-design project is coming along swimmingly. One of the first things on my checklist was to find a new, white bedspread.

I wish I could say that I searched high and low for this one, but it pretty much fell into my lap. Or, fell from a shelf onto my head as I was reaching for it at Marshalls.

But anyway.

I really love the crisp, white color and the bonus adorable stitching. Here's a close up so you can see a little better:


See? Cute as all get out. Now I really feel like the "Blank Canvas" is just waiting for a beautiful infusion of color. I am itching to get sewing!

I must share though, that this was not one of my proudest "thrifty" moments. I bought the bedspread from Marshalls for around $60 (good deal, right? Think again...), and then yesterday I happened upon an entire duvet set for only $24.99 at good ol' Tarjay. Seriously? It definitely made my heart a little sad. Just goes to show you that it's always best to shop around!

I feel it pertinent to note though, that I did make up for this lack in thriftiness by scoring a 100% cashmere sweater for $4.99 at GW the next day. Phew.

Wednesday, February 23, 2011

If you give a homemaker a hammer...


Sometimes, when we're working on various housey things, I feel like that little mouse in the book "if you give a mouse a cookie." I like to call it "Decorating ADD." I'm sure that's not original to me, but it just works so well to describe the never-ending stream of projects that seem to flow from my imagination.

So, we started out innocently enough with a thrift-store light fixture that got a sweet makeover a few weeks ago. Then, I started thinking about how I should rearrange our dining room to accomodate for the new fixture (it's a little off-center).

Then, I contemplated new wall colors for the dining room/kitchen area. But, I took a break from that to come up with a new color scheme for our bedroom. I even bought some fabric!

And seriously, I have been meaning to get to that little pile of fabric for 2 whole weeks. I am dying to sew up some pillows! But last Friday, when my sweet hubby looked at me and said "Honey, let's paint the kitchen cabinets this weekend!" of course my decorating ADD was focused on that project like a laser beam.

So here we are, 3 weeks and 3 projects later. Our kitchen is still a mess, cupboard doors are littered all over the house. I still have a pile of fabric sitting somewhere (it might take me a while to find it..). But, the good news is... the light fixture is up! I was waiting until I could get some better pictures, but seriously, who knows when our house is going to look decent again?


So there you have it. The result of Decorating ADD. Please tell me I'm not the only person that suffers from this horrible disorder?

Monday, February 21, 2011

This Weekend...

# of Kitchens that got a facelift: 1

# of Kittens who had to be locked away for 24 hours: 1

# of Kittens who meowed anxiously for nearly 24 hours: 1

# of cabinets scrubbed and painted: 14

# of weary workers: 2

# of marriages tested by fire: 1

# of sore muscles: unable to determine

# of hours spent painting: 13

# of pounds lost: 3 (awesome!)


More info to come..... =)

Friday, February 18, 2011

Black Bean Soup


Even though the first hints of Spring are in the air, I'm still feeling the need to consume lots and lots of soup. Something about the warm, hearty, savory flavor of soup is just so delicious in the colder months!

Yesterday I whipped up my own version of Black Bean soup, and I want to share the recipe with you because it's SO easy, and SOOOO good. Also, I love how most of the ingredients come straight from the pantry, so you can make it without running out to the grocery store for ingredients!

So without further ado, here ya go:

Black Bean Soup (A La Posy the Porcelain Pig)

2 cans of black beans, rinsed and drained
2 cups chicken broth
1 cup water
3 tbsp butter
1 small onion, diced
2-3 cloves minced garlic
1-2 tsp flour
1 tsp chili powder
1/2 tsp cumin
Dash of cayenne
1/4 cup minced, fresh cilantro
Salt and pepper to taste (I used about 2 tsp salt, and 1/2 tsp pepper)

Start off by pouring the rinsed black beans, chicken broth, and water in a soup pot to simmer. Then, melt the butter in a pan and saute the onions and garlic until the onions are clear. Add the flour to the onion mixture and stir to form a paste, then add mixture to soup pot. Sprinkle in the chili powder, cumin, cayenne pepper, salt, pepper and cilantro.

Garnish with cheese, sour cream, and fresh cilantro if desired. (Salsa would be good too! Yum!).

Serves 2-5, depending on your appetite. =)

Bread-Making Part Deux

So I am back again, and this time I have GOOD NEWS! It worked, y'all! Just take a gander at this photo below, and see for yourself what I mean.


That, my friends, is the marvelous sight of bread actually rising. The last time I made bread, the dough was so over-laden with flour that it barely rose at all. But this.... this is how bread should look!

And this:


And finally, THIS:


So thanks to you guys for listening to my woes about baking bread, I finally feel like I'm on the right path! I know now that it's more important to go by what the dough feels like when adding in flour, rather than what the recipe says. Last time, the recipe said to add 5-6 cups of flour, and this time I stopped after adding 4 cups and it was perfect!

Now I can cross the whole "Bake Bread From Scratch" off my life-goals list. =) What, you don't have one of those?


P.S. Did you notice that tiny glimpse of soup to the right of the bread? That is a delicious black bean soup... check back here later for the recipe! XOXO, Mikalah.

Thursday, February 17, 2011

I Caved.


After searching High and Low for a mysterious product called "Krylon Mirror-Like Spraypaint" during the Christmas season and beyond, I finally gave up. I declare that this paint is nowhere to be found in the great state of Minnesota.

And, call me a cheapo, but I absolutely refuse to buy spraypaint online and pay shipping charges. No can do. But without that paint, you really can't recreate the adorable mercury-glass lookalikes that are popping up all over blogland (apparently these bloggers do not live in MN).

So, after waiting for 2 months, I finally caved.


Say hello to the newest member of the Decorative Baubles of the Marx Household Association. Kind of a tongue twister, I know. =)

I love this little vase/candleholder/dust catcher so much. I think it might be a candidate for our new bedroom makeover as well! But for now, it's sitting on our dining room table all cute and mercury-glassy.

So my question of the day for you is:

Have you ever been unable to complete a project, and just run out and bought the thing you were trying to make?

Waging a War Against the Brass

Yup, you heard me right. I've lived in this house for over a year and a half now, and finally decided that it's time for the horrid, brassy light fixtures in our house to go down one by one. First up, I set my sights on the one hanging above our dining room table.

I wish I had an "after" pic to show you right this very moment, but sadly the "new" (to us) light fixture that we bought from the Habitat for Humanity ReStore is in the midst of a makeover.

Have you ever had a can of spraypaint literally die on you mid-project? That's what happened last week as I was just about to put the finishing touches on this baby. It was very anti-climatic.


But, instead of freaking out, I gave the spraypaint manufacturer a call and explained the situation. After the rep was satisfied that I was not just some idiot who didn't know you're supposed to take the cap off, shake the bottle, and press the nozzle to release the paint, they sent a brand-spanking-new bottle o' paint my way so hopefully I will have some results for you tomorrow!

And as a side note- the spray paint I used was Krylon. I have to say that i was really pleased with their customer service. I have never spray paint go bad before, but they handled the situation really well! Go Krylon! (They didn't endorse me for this, it's just the plain old truth!).

Tuesday, February 15, 2011

Decorate Your Heart- Reconciliation


What is it about family that can strike a nerve like no one else can? They know us so well, and are so familiar with our faults and weaknesses. It's a blessing and a curse at the same time.
On Sunday, my brother and I had a little face-off. To be honest, I'm not even sure I can pinpoint exactly what started it. It was probably just an offhand comment that went awry. But, what started out innocently enough turned into angry words, closed hearts, thoughts that I don't even want to admit existed.


I felt miserable. I've gone through the past 2 days thinking over what happened, simultaneously angry at my brother and at myself. And today, two days later, I was still feeling the nudge of the Holy Spirit. I wanted to spend time in God's word, but realized that I needed to be reconciled first. How can I enter into the presence of One so holy, so gracious, when my own heart is harboring bitterness?

So, I made the call. And the words were healing, transforming, renewing. We spoke, we listened, we set down our weapons and let the reconciliation happen. The enemy may love to see us war with each other, but God's love of reconciliation is even stronger. It is amazing to see Him work in our human situations, and feel His love emanate when we obey his gentle prodding.

Sometimes, reconciliation can't happen on both sides. But I'm determined to be at peace with others as much as possible. I want my home to be a place where friends, family, loved ones can come and meet and truly experience God's love. Instead of holding onto bitterness and nursing grudges and letting that permeate our home, I want to be in the business of reconciliation.


Matthew 5:23-24 “Therefore, if you are offering your gift at the altar and there remember that your brother or sister has something against you, leave your gift there in front of the altar. First go and be reconciled to them; then come and offer your gift."

2 Corinthians 5:17-19 "Therefore, if anyone is in Christ, the new creation has come: The old has gone, the new is here! All this is from God, who reconciled us to himself through Christ and gave us the ministry of reconciliation: that God was reconciling the world to himself in Christ, not counting people’s sins against them. And he has committed to us the message of reconciliation."

Pulling the Colors Together


Coming up with a color scheme is fun. But when it comes to actually picking out items that really go along with the colors you chose, well, that can be a little challenging!

I remember choosing colors for my wedding and nearly ripping my hair out over things like
"That bridesmaids dress is not the right shade of Warm Teal!"

I'm realizing more and more that color is not necessarily a hard and fast rule, but more of a guideline. Also, having colors that are similar shades without being an exact match can actually help bring out more of the color you are going for than if you only had the same exact shade throughout.

(Image from Ideal Home)

Like in the image above, I love how all the different shades of yellow compliment each other and bring out the best in the other colors. What do you think?

I'm hoping that I can recreate that for our bedroom makeover as well. I found some fabric for accent pillows, and I'm super excited to sew them up and see how they look together.


The green fabric will be on 2 square pillows, and the colorful fabric will be on a round pillow with a covered button. I couldn't resist the floral fabric, it was just calling my name! I think so far the yellow fabric will be used on piping and maybe another pillow.

All the fabric came from JoAnnes basic line of home dec fabric. I love their fabric, because it's always $9.99 per yard and you can use your coupons to get up to 50% off! I think I got close to 3 yards for less than $20. Score!

Also- fellow blogger Jane was at JoAnne's as well and noticed that the green fabric from my last post is also there. So, if you liked that fabric too it would be a lot cheaper to just buy the fabric and sew up some slipcovers! Thanks Jane!

Friday, February 11, 2011

New Color Scheme- Citrus Tones

Yesterday, I opened some doors (that usually stay closed when company's over!) to give you guys a glimpse into our bedroom. It really needs a makeover and some updating throughout.

One of the biggest parts of a project for me (and frankly, the part that never feels "finished"), is the color scheme. I'm a big advocate of choosing more neutral colors for walls, and then changing up color schemes by incorporating new accessories when needed.


So as you can see, the original "color scheme" for our room was gray, and light blue. Once we bought the bedding and painted the walls, I felt like the room was a little dreary. So painting the bed frame white, and adding in some chic white lamps and curtains was my lame attempt at brightening up our room. Really, I don't know what I was thinking here. I love bright, airy, fresh colors and this room obviously doesn't fit the bill.

So, how do you bring a room from gray and dreary, to warm and bright? Well, here's the plan. To offset the warm gray walls and the bright white curtains/lamps/bed frame, I chose 2 citrusy colors to infuse some light and warmth into the space:

I'm already loving this trio of colors, and thinking they will be great friends and work together to make our bedroom a brighter place. What do you think?

As for the actual game plan, I'll start off by sewing a new duvet cover for our bed, that will most likely be a crisp white color.


I love this version from Target, and at $69.99 it might end up being a better deal to just buy it! I think white bedding is the best choice for us to brighten up the space a bit and provide a nice clean canvas for the new color scheme.

Next, I would add in some throw pillows in the accent colors. I looked to Etsy for some inspiration, and I wasn't disappointed! If I weren't planning to sew my own pillows, I would probably be purchasing them from Etsy. The prices are very reasonable, plus most of these items are made by hand! Here's a few that caught my eye:

(Pillow from Urban Fringe @ Etsy- $24)

(Pillow cover from Freshly Sewn @ Etsy- $14)

(Pillow from Purple Pajamas @ Etsy- $38)

After pulling in the accent colors with some textiles, I would put some art on the walls that would continue the color scheme. In keeping with the fresh citrus tones, I want to draw inspiration from nature. I found SO MANY lovely prints on Etsy, I think it would be really difficult to choose one (or even two or three!).

Here's a few that I absolutely adore:

(Out of Winter by urbandesign)

(Sugarplum Vines by urbandesign)

(Lichen by atashtoys)

(Dogwood by TCaponePhoto)

(Into the Mystic by honeytree)

Do you see what I mean? I love all of these prints. I wish I could just buy them all!

One thing that helps me when I'm first getting the feel for how I want to decorate a room is finding an item that represents the color scheme. It can be a piece of fabric, a picture, a throw pillow, or pretty much anything. It helps to have a reference point to go back to throughout the project. I haven't found the exact thing for this room yet, but I'm still looking!

In the next few posts, I'll share the deets on how I plan to update the rest of the room with furniture and accessories. I can't wait to hear what you think so far!

How about you? Where do you go for inspiration? What are the first steps you take to decorate a space?


As always, I feel it's pertinent to mention that I was not paid to endorse Etsy or any other retailer mentioned in these posts. I just love to share great finds with my readers! Hope you enjoy.

Thursday, February 10, 2011

Updating the Bedroom

I think my bedroom has been featured on this blog a grand total of two times. Why is it that our bedrooms always get the least amount of care? There are some days when I leave the room, shut the door, and don't go back in until it's time to go to bed.

Well, not anymore. I am bound and determined to do some makeover magic in this room! Of course, it's going to be on a relatively small budget (uhm, like, free...), and thankfully we won't need to purchase any furniture (unless I can talk the hubs into buying us a new bed frame from IKEA!).

So here is the room in it's current (ho-hum) status:


Of course, there are definitely things I love about our room. The lamps, side tables, curtains, and bamboo shades are all on my "LOVE" list. We used to have the bed against that wall on the left, but moved it about a year ago and I'm really happy with it's new spot.


On one side of the room is Josh's dresser, and a photo from our engagement shoot. I love that picture, but I think it definitely needs an updated frame. The black isn't really doing it for me in this space. Also, I'm planning to paint both of our dressers to give them an updated look. They are vintage dressers, solid wood, that were given to us by a lady from our church, along with lots of other furniture, when she found out we were engaged. How cool is that?


Another thing that is needing to be updated is our overhead fan. Josh and I try to be good about not using the AC too much in the Summer (oh, the expense!), so an overhead fan is a MUST for those warm Summer nights. So instead of replacing the whole thing, I think I will whip out the spray paint to cover the brass and see about getting some new glass shades to replace the outdated, frosted ones.


Here's the other side of the room, which houses my dresser and a mirror I've had since High School. I still love the classic shape of the mirror, but I have a few ideas up my sleeve for how I can update it to bring in some more interesting elements.


Here on the right is the entrance door, and on the left is our walk-in closet. Gotta love those wood, bi-fold doors. Sigh.


And of course, the closet. We left the original paint in there when we painted the room mostly because I was too lazy to move all of our clothes out. Also, I distinctly remember thinking "it's a closet. Why would we care what our stupid closet looks like?" Apparently, that was before I saw what closets could potentially look like and decided that I wanted a glamorous room to put my shoes in too.

(Paris Hilton's closet, image via Decorpad)

Ladies, I will give you a moment to wipe away the drool and let your heart calm down. Who wouldn't want a closet like that? Ok, so maybe all this glamour is not in the foreseeable future for me (I'm guessing Josh wouldn't be drooling over this, maybe laughing, but not drooling), but our closet could definitely use some updating.

So, to summarize, here's one last glimpse of the room in all it's "Before" glory.


Along with a few little notes about the changes that are going to be happening. Yay! Stay tuned, I am planning a post tomorrow that will give you a better idea of the new color scheme I want to incorporate. How about you? Has your bedroom been sadly neglected too, or is it just me?